
Email marketing is still one of the best ways to keep your customers engaged. You should integrate MailChimp into your Elementor website, because it’s a powerful way to build up your email list and automating your marketing campaigns. In this tutorial, we will walk you through the steps to add MailChimp integration to your Elementor forms.
Step 1: Create a MailChimp Account
To get started, you will need to create a MailChimp account if you don’t already have one. Head over to MailChimp’s website and sign up for a free account. Once you have your account, you will need to create a new mailing list.
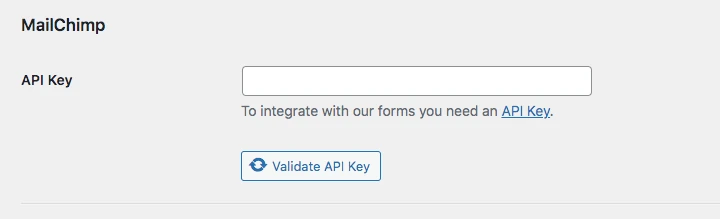
Step 2: Get Your MailChimp API Key
In order to integrate MailChimp with Elementor, you will need to generate an API key. To do this, log in to your MailChimp account and navigate to the “Account” menu. Click on “Extras” and then “API keys” to generate a new API key.
Step 3: Install the Elementor Forms Plugin
The next step is to install the Elementor Forms plugin on your WordPress website. You can do this by navigating to the “Plugins” menu in your WordPress dashboard and searching for “Elementor Forms.” Install and activate the plugin.
Step 4: Connect MailChimp to Elementor
Now that you have your API key and the Elementor Forms plugin installed, you can connect MailChimp to Elementor. In your WordPress dashboard, navigate to “Elementor” and click on “Settings.” Scroll down to the “Integrations” section and click on “MailChimp.” Enter your MailChimp API key and click on “Connect.”
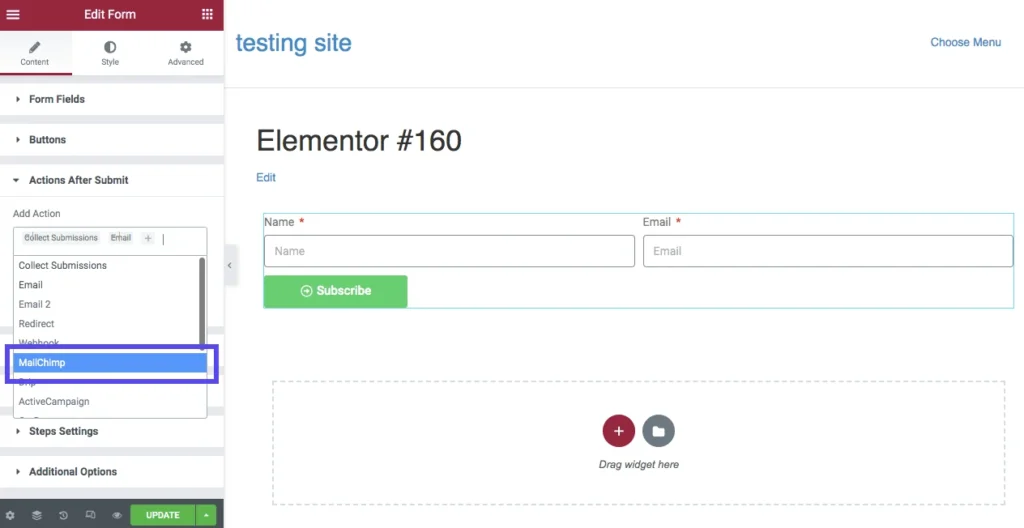
Step 5: Add MailChimp Integration to Your Form
With MailChimp connected to Elementor, you can now add the MailChimp integration to your form. Go to the page where you want to add the form and open it in Elementor. Drag and drop the “Form” widget onto the page and customize it to your liking.
Once you have your form set up, click on the “Actions After Submit” tab in the form settings. Click on “Add Action” and select “MailChimp” from the dropdown menu. Choose the MailChimp mailing list you want to use and map the form fields to the corresponding MailChimp fields. Click on “Save” to save your changes.
Step 6: Test Your Form
To make sure your form is working correctly, fill out the form and submit it. You should receive a confirmation message and be added to your MailChimp mailing list.
If you encounter any difficulties with integrating MailChimp into your Elementor website forms or have any questions, don’t hesitate to reach out to Gavamedia. Our team is here to help you grow your email list and automate your marketing campaigns. With our expertise, we can guide you through the process and ensure that your integration is working smoothly, allowing you to connect with your audience and drive more sales. Sign up here, and we can help you get started today.
Discover more from GAVAMEDIA
Subscribe to get the latest posts sent to your email.